I remember the first time I worried about losing control of my dog at the park. My Labrador mix, eager and fast, slipped past my call and vanished into a tangle of trees. That moment taught me the value of clear communication and boundaries. It's why I learned how to use a dog training collar with care, never as a shortcut or punishment but as an extension of the trust I had built.
Before I consider how to use a training collar on a dog, I make sure basic skills are solid. These include respect, impulse control, and reliable on-leash cues. Modern e-collars—like the Mini Educator from E-Collar Technologies—offer tone and vibration in addition to stimulation. They can act like an invisible leash when I need reliable off-leash recall. Quality matters; cheap units can be inconsistent and harsh, so I choose devices known for precise, waterproof performance and a wide, controllable range.
In this article, I'll walk through how to use dog training collar tools responsibly. We'll cover fitting and testing to introducing tone and vibration before any stimulation. I use collars only after laying a strong foundation. Always finding the lowest effective level and using the collar to communicate, not to intimidate.
Key Takeaways
- Use a training collar only after building trust and basic obedience.
- Choose high-quality, waterproof units like the Mini Educator for consistent results.
- Introduce tone and vibration before using stimulation to create clear signals.
- Find the lowest effective level and let the dog wear the collar to normalize it.
- Treat the collar as a communication tool, not a punishment device.
Why I Use Training Collars Carefully and When I Recommend Them
I'm careful with electronic collars. I believe in building trust and setting clear boundaries first. This approach keeps the dog's well-being in mind.
My position on e-collars versus other tools
I like positive reinforcement and using leashes for basic obedience. Remote trainers are useful when we can't be close. I choose e-collars with tone and vibration, avoiding shock-only devices.
When a training collar is an appropriate option
I suggest a collar for off-leash safety, like hiking near roads. It helps teach recall and basic cues.
It's also good for dangerous behaviors that don't respond to other methods. Used right, it can save a dog from being abandoned.
Why I usually try other methods first
I start with reward-based training and management. This builds trust and clear communication.
If that doesn't work, I use an e-collar with a trained professional. It's a last resort, used with care and control. The goal is to communicate, not punish.
how to use a dog training collar
I see a training collar as a mental leash. It helps me send clear messages to a dog. The goal is to teach the dog to respond, then fade out the cue.

Understanding the collar as a communication tool, not punishment
I never use a collar to scare or punish. I pair signals with voice and body language. This way, the dog learns what I want.
The collar must be fair, immediate, and consistent. This helps the dog link the cue to the behavior, not fear.
How I set expectations: foundation of trust, boundaries, and impulse control
First, I teach basic obedience without the collar. Commands like sit, stay, come, and heel are key. Then, I wear the collar during outings for months to make it normal.
I follow the “90% rule”: the dog should respond reliably most of the time. I teach impulse control in short sessions and reward correct choices. I introduce tone and vibration in quiet settings, pairing them with treats for 10–15 minutes over a few days.
Working with a trainer vs. DIY—why I recommend professional guidance
I suggest a certified trainer when starting with an e-collar. A pro helps find the dog’s recognition level and shows how to phase cues out. They reduce the chance of overuse and teach precise timing for release and reward.
If you prefer to learn on your own, start in low-distraction areas. Test stimulation on your palm first. Only layer cues onto commands your dog already knows. For many owners, guided lessons speed progress and keep training humane and effective.
Choosing the right type of dog training collar for your dog
I choose tools that fit the dog and the training goal. A good collar is humane, predictable, and fits the dog's size and health. I prefer devices that let me communicate clearly and without surprises.
Differences between e-collars, shock collars, prong collars, and vibrate/tone collars
E-collars, like the Mini Educator, offer a range of stimulation. They go from gentle vibration to subtle electrical levels. They are not like old shock-only devices. I teach using low, repeatable settings and clear cues.
Prong collars use mechanical pressure around the neck. I use them only when the dog's anatomy and behavior justify it. Fit and supervision must be strict. Tone and vibration collars give non-aversive cues for basic recall or attention work.
Why quality and consistent stimulation matter
Cheap remotes can pulse unpredictably. I avoid those. A consistent signal helps the dog learn cause and effect. I look for devices where a setting feels the same every time, so the dog can trust the cue.
When teaching handlers, I start at the lowest effective level. I use a long line for early work. I test vibration and stimulation on my hand before using it on a dog to ensure predictability.
Considerations for dog size, temperament, and health
Small dogs need lighter devices and shorter contact points. Heavy breeds can handle sturdier gear but may need a broader strap for comfort. I match tools to body type to reduce risk of neck strain or skin irritation.
Temperament matters. Nervous or reactive dogs often do best with tone or vibration first. Confident dogs with strong drives may require clearer pressure or a calibrated e-collar. I always check for medical issues before choosing a prong or tight-contact device.
Below is a practical comparison to help choose between options based on common needs.
| Collar Type | Best Use | Key Advantage | When I Avoid |
|---|---|---|---|
| E-collar (modern) | Long-range recall, off-leash control, precise cueing | Wide, consistent stimulation range; waterproof models like Mini Educator | Cheap, unregulated units with harsh output |
| Shock-only device | Rarely; legacy systems or very specific oversight | Simple construction | When humane, adjustable options exist; unpredictable intensity |
| Prong collar | Short-term management for strong pullers when used by a skilled handler | Mechanical pressure that can give immediate feedback | Small dogs, dogs with neck injury, unsupervised use |
| Vibrate/tone collar | Attention-getting, early recall training, hearing-limited dogs | Non-aversive; good first step before stimulation | Dogs that ignore vibration or need stronger cueing for safety |
I recommend working with a certified trainer when testing tools. My goal is clear communication that keeps the dog calm and learning. Learning to use a dog training collar requires patience, proper fit, and respect for the dog’s body and mind.
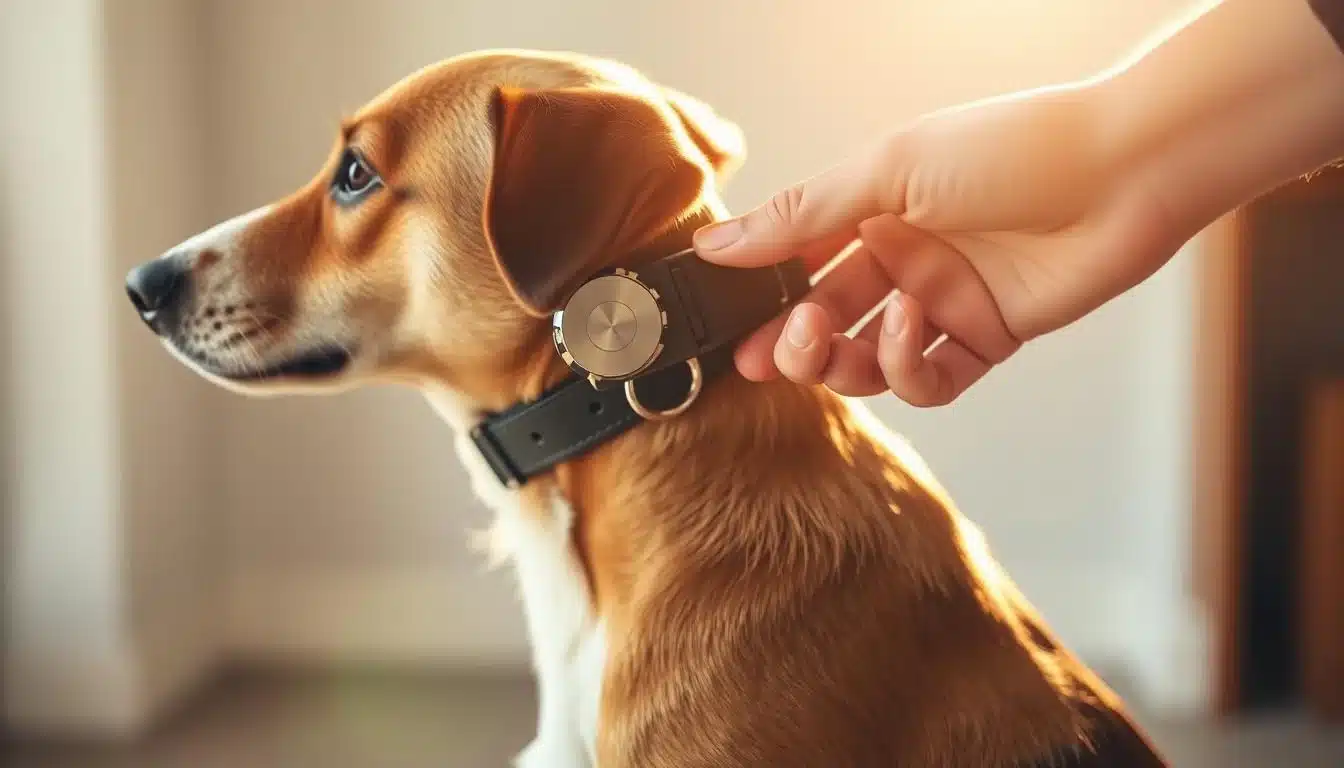
Fitting and preparing the collar on your dog
I start by letting the dog stand calmly while I fit the collar. This helps me check placement and tension without the dog lying down or pulling. Proper fit sets the stage for safe, clear communication when I show owners how to use a dog training collar.

How I ensure prongs/contact points touch skin without being too tight
With prong collars, I make sure the contact points rest against the skin. This way, the collar can work as designed. If the prongs sit over fur only, the device may not register correctly. I fit the collar like a belt—neither digging in nor so loose it slides.
I check the fit while the dog is standing and relaxed. When I explain how to use a prong dog training collar, I show owners how to spread the links. I also test that each prong sits flat against the neck without pinching.
Checking comfort: one-finger rule and proper placement
I follow the one-finger rule: one flat finger should slide between collar and skin. That gives a snug but comfortable fit. I avoid collars that ride high on the throat or low on the windpipe.
When I teach people how to use a training collar on a dog, I emphasize correct placement behind the jawline. This keeps pressure on the wider part of the neck and reduces risk to delicate areas.
Allowing your dog to wear the collar before active training
I let the dog wear the collar for short periods over several days before starting formal sessions. This helps the dog accept the collar as a normal item and prevents the collar from becoming a signal for immediate correction.
For owners learning how to use a dog training collar, I advise gradual wear time. Increase sessions to several hours if the dog shows no irritation. Check skin under the collar each day for redness or chafing.
| Fit Step | What I Do | Why It Matters |
|---|---|---|
| Dog position | I fit the collar with the dog standing and calm | Ensures accurate placement and realistic tension under normal posture |
| Prong contact | Make sure prongs touch skin flatly, not over heavy fur | Allows consistent stimulus and prevents missed signals |
| Tightness | One-finger gap for snug comfort | Prevents rubbing and reduces risk of discomfort |
| Strap trimming | Trim excess 3–4" for adults, ~6" for growing dogs; point tip for threading | Cleaner fit, less snagging, safer during play |
| Wear-in period | Allow short wear periods over several days before active training | Helps the dog accept the collar so it does not signal worry or correction |
| Monitoring | Inspect skin daily and check for irritation after long wear | Early detection prevents sores and keeps training ethical |
Turning the device on, charging, and everyday care
I treat electronics and fit as part of training. Charge gear before sessions so the Mini Educator shows solid green when done. A flashing amber means low battery; charge as soon as possible. I keep the remote and receiver off between sessions to save power and avoid accidental signals.
Charging best practices and avoiding overcharging
I plug the unit in after a heavy session and watch the indicator. For the Mini Educator, red means charging and green means complete. I remove the charger at green and avoid leaving it plugged in overnight. Letting the battery run completely flat can shorten its life, so I top up regularly.
Turning the remote and receiver on/off and testing before use
To power the Mini Educator remote, I hold the circular button until the display shows OF or the unit lights up. The same button cycles the night light modes: one push for pulse, two for steady, three to turn it off. I pair collar and remote by aligning the red dots and swiping together. Before putting the collar on my dog, I test vibration on my palm and confirm buttons work without accidentally activating stimulation.
Waterproof seals, night light, and trimming the strap for fit
After charging, I press waterproof stoppers back flush to protect seals. Check the rubber plugs and contact points for grit or wear; replace them if damaged. The night light helps locate a dog in low light, so I confirm mode is off unless I need it. I trim long straps as recommended earlier and keep a lanyard or clip on my remote so it’s secure on my belt loop or pack for quick access.
Small habits make a big difference. I practice quick access to controls, twist the level dial smoothly, and store devices in a dry place. These steps keep training reliable and extend battery life while teaching how to use a dog training collar, how to use a remote dog training collar, and how to use dog shock collar tools responsibly.
Finding your dog's recognition level and testing stimulation
I start every session in a quiet spot with my dog to find the right collar settings. I keep things calm and short. This helps me learn the smallest input that gets a clear, nonpainful response.
How I slowly find the lowest effective level
I start with the lowest numbered setting on the receiver and use a tone only. If the tone doesn't get attention, I add the smallest increment of stimulation. On devices like the Mini Educator, trainers often start around 3–8 and move up by 5–10 if needed.
I look for subtle cues: ear flicks, head turn, tail shift, or a pause in movement. These signs tell me the dog has registered the cue. My goal is the lowest effective level that creates a clear, calm acknowledgment.
Testing vibration and stimulation on my palm before using on the dog
Before I touch the collar to my dog, I feel the vibration and stimulation on my palm or forearm. This prep gives me a sense of what the dog will feel. Humans typically sense stimulation around 12–20 on the wrist, while many dogs work well near 7–12 as a starting base.
Testing on skin helps me avoid surprises. It also keeps corrections precise and predictable when I move to the dog.
Using the lightest effective setting and resetting to base after use
I always use the lightest effective setting and return the dial to base after each correction. If I must raise the level, I drop back to the base number as soon as the response happens.
If an accidental overcorrection occurs, I call the dog, lower the level, give a brief pet for reassurance, and continue the session without overdoing apologies. This keeps the lesson clear and steady.
Introducing tone and vibration before stimulation
I start every session by teaching clear cues before using stimulation. This makes learning easier and reduces stress for the dog. I use tone and vibration to teach the dog to respond to warnings or rewards.
Tone first: I press the tone button for about two seconds, then reward immediately. For two to three days, I spend 10–15 minutes daily. This helps my dog learn to anticipate the reward.
Vibration next: I use vibration as a reliable first-step communicator when tone is hard to reproduce. Vibration feels consistent across sessions. On some units, like the Mini Educator, the T button gives a distinct vibrate signal that the dog learns quickly.
I layer tone or vibrate with commands the dog already knows, such as sit or come. This makes it easier to progress later. This approach shows how to use a dog training collar without abrupt escalation.
Only after the dog reliably responds to tone and vibration do I test the recognition level for stimulation. I keep stimulation as an extension of an existing cue so the dog learns escape-to-compliance rather than guessing what caused the sensation.
When working on nuisance behaviors like barking, I use tone and vibrate to teach a quiet cue before considering stimulation. This explains how to use dog training collar for barking in a stepped, humane way. It also ties into how to use a remote dog training collar as a communication tool rather than a surprise.
How to use a remote dog training collar for basic commands and recall
I teach dogs basic cues and recall with clear steps. I pair the collar with commands they already know. This way, the device becomes a communicator.
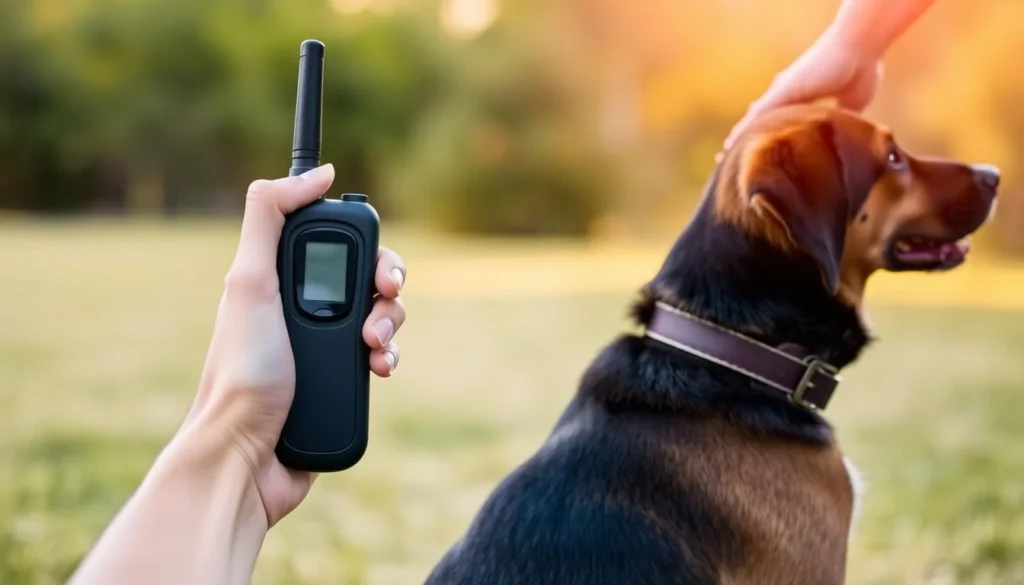
I start by linking collar cues with commands like sit, stay, come, and heel. I guide the dog into a sit, give the command, and press briefly at the recognition level as I ask. When the dog complies, I release immediately and reward with a treat and verbal praise.
For recall, I use a long line and low-level stimulation. This lets the dog explore safely. I call the dog, press the cue, and guide with the leash if needed. When the dog moves toward me, I stop stimulation and reward.
I keep stimulation at the lightest effective setting and test it on my palm first. I use a separate non-metallic collar above the receiver during groundwork to avoid unwanted pressure on contact points. Consistent use across places for several months helps generalize the behavior, with a goal to phase out stimulation as the dog reaches reliable responses.
Here is a simple practice plan I follow to teach recall and basic commands:
- Warm-up: brief leash work with known commands for 3–5 minutes.
- Pairing: add the remote cue while giving the command, release on success.
- Long line: allow distance, call, apply cue, guide if needed, reward return.
- Repeat: short, positive sessions with varied locations and distractions.
- Fade: gradually reduce reliance on stimulation as the dog reaches 90% success.
I watch body language closely. If a dog shows stress or confusion, I stop, regroup, and simplify the task. Clear timing, consistent rewards, and safe progression make using a remote dog training collar practical and humane.
| Step | Action | Tip |
|---|---|---|
| 1 | Establish recognition level | Test on your palm, use lowest effective setting |
| 2 | Pair with known commands | Press briefly during command, release on compliance |
| 3 | Use long line for recall | Let dog roam, call, cue, guide, reward return |
| 4 | Immediate release | Stop stimulation the moment the dog responds |
| 5 | Reward and repeat | Keep sessions short, end positively, vary settings |
How to use a dog training collar for barking and other nuisance behaviors
I first figure out why my dog barks. I look for signs like alerting, greeting, boredom, or seeking attention. Knowing the reason helps me pick the right approach before using any correction tool.
I introduce cues and signals slowly. I teach a clear "quiet" cue using tone or vibration first. Once my dog reliably responds, I add gentle stimulation only as a last step. This way, I use a dog training collar without confusing or frightening the dog.
I keep levels low. I find the recognition level, then set stimulation one step above it for correction. I press the remote when barking starts, say "quiet," and release the stimulation the instant my dog stops. I reward immediately so the dog links silence with praise.
I stay cautious around other dogs. Using an e-collar near unfamiliar dogs can make a dog feel attacked. I avoid stimulation when other dogs are close until the dog understands the cue and the sensation is familiar.
I use bark-specific devices only in certain cases. When yard barking persists while I am absent, a dedicated bark collar can help manage behavior. I pair any device with exercise, shade, and environmental fixes so the root cause is addressed.
I keep two firm rules. One, never rely on correction alone. Two, pair the cue with reward and management changes. That approach shows exactly how to use dog shock collar for barking in a way that respects safety and long-term learning.
Below I compare common options and when I choose them in my training:
| Tool | Best use | My protocol |
|---|---|---|
| Tone or vibration collar | Initial cueing, indoor nuisance barking | Teach "quiet" with tone, reward for compliance, use vibration before stimulation |
| E-collar (modern remote) | Persistent nuisance barking tied to habits or safety issues | Find recognition level, set one step above for correction, pair with "quiet" and reward |
| Bark-specific collar | Unattended yard barking, continuous noise when owner absent | Use only when management and exercise are in place; monitor for overuse |
| Environmental management | Boredom, guarding, or alert barking | Shade, toys, exercise, visual barriers; combine with training for lasting change |
How to use a prong dog training collar and safety considerations
I use prong collars for dogs with strong pulling or for working breeds needing control. It's important to remember that prong collar safety is key. Most dogs do better with harnesses, front-clip tools, or positive training first.
I teach owners to use a prong collar only after simpler tools and exercises fail. This device provides pressure like a corrective nip. But, misuse can cause pain and fear.
When fitting a prong collar, I check it carefully. It should sit high on the neck, just behind the ears. The prongs should touch the skin but not dig in. I use the one-finger rule to avoid too much tightness.
I watch for signs of trouble when a dog wears a prong collar. Look for reddening, hair loss, scabs, or any change in behavior around the neck. If irritation appears, remove the collar and pause training. Regular checks are crucial for prong collar safety.
I like to mix brief prong use with positive training to teach self-control. Teach commands like sit, wait, and heel using rewards. This approach helps the dog learn without needing mechanical corrections.
It's worth exploring safer alternatives. Front-clip harnesses, head halters, and well-tuned e-collars from reputable brands offer control with less risk. Pair these tools with impulse-control drills for lasting change.
I suggest getting professional help to learn how to use a prong dog training collar. A certified trainer can show you how to fit it right, use it briefly, and stress safety. This keeps the dog safe and the handler confident.
How to use a shock collar for dog training responsibly (safety and ethics)
I use electronic collars with care and clear rules. My goal is to communicate with my dog humanely, not to cause pain. I explain how to use dog shock collars so owners can understand the risks and avoid harm.
Understanding modern e-collars versus crude shock-only devices
Modern e-collars from brands like Garmin and SportDOG offer tone and vibration settings plus a wide stimulation range. Older shock-only units have few levels and can be jarring. When I show owners how to use a shock collar for dog training, I emphasize devices with fine control and non-painful channels.
Principles I follow: minimal level, clear cause-and-effect, and resetting to base
I always find the lightest effective level and test on my palm before using on a dog. I pair a tone or verbal cue with the brief stimulation, then stop as soon as the dog responds. After each correction I reset to the base level so no lingering stimulation continues. These steps show how to use dog training collar responsibly and keep training humane.
Signs of misuse, how to avoid them, and when to stop and consult a trainer
Watch for yelping, shrinking away from other dogs, neck irritation, or sudden behavioral shifts. Those signs mean stop immediately. If problems appear I recommend contacting a balanced professional trainer such as a certified force-free or low-force specialist. Never rely on repetitive pressure, and avoid using collars as a substitute for structure or enrichment.
Below is a simple comparison to help assess device features and safe practices.
| Feature | Modern e-collar (recommended) | Shock-only collar (caution) |
|---|---|---|
| Stimulation options | Tone, vibration, wide-range stimulation (0–100) for fine tuning | Limited levels, often abrupt sensations |
| Control precision | High precision to use the lightest effective level | Low precision increases risk of overcorrection |
| Best use | Temporary communication for recall, danger control, and problem behaviors when other methods fail | Rarely recommended; potential for fear and pain |
| Safety checks | Test on palm, inspect contact points, reset to base after correction | Hard to calibrate; test methods unreliable |
| Signs to stop | Yelping, avoidance, neck sores, increased fear | Same signs plus escalation of aggressive or terrified responses |
If you want guidance on how to use a dog training collar responsibly, I recommend starting with a consultation. I work with trainers and owners so devices stay a short-term, ethical tool in a broader training plan.
Conclusion
I've learned that an e-collar can be a great tool for training dogs. It works best when used with care, consistency, and a solid training base. Start by making sure the collar fits right and using low settings. Mix tone or vibration with treats to help your dog get the message.
Teaching others about using dog training collars, I stress the importance of getting help from experts. Use top-notch gear like the Mini Educator and keep training sessions short and positive. Remote trainers are key for off-leash safety and recall, especially when you follow the 90% rule.
It's also crucial to watch how your dog reacts to the collar. Keep the stimulation low and reset to the base level after each use. If you're unsure, always check with a certified trainer and follow local laws to keep your dog safe and your training on track.